
How to Make Miso
With only 3 ingredients, you can make one of the best Japanese seasonings to enhance your cooking. We hope this tutorial helps you with DIY miso making.
Equipment
- 1 Pressure Cooker (Stock Pot)
- 1 Plastic bag
- 1 Bowl
- 1 Preparation container (container/vessel that has zipper/fastener seal)
Ingredients
- 500 g Soybeans (17.6oz)
- 1 kg Dried Rice Koji (35.2oz) In case of mixed miso or Awase miso, use half rice koji and half barley koji. ※You can also use raw malt/koji.
- 300 g Salt (10.5oz)
Instructions
Step ① Wash the soybeans
- Put the soybeans into a bowl, then wash and rub the soybeans thoroughly in water to clean off any dirt. Be careful not to break the skin while washing the soybeans.
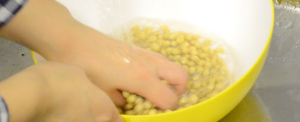
- Soil and dirt on the unwashed soybeans have tons of microorganisms that will negatively impact the process when making miso. Make sure to do this thoroughly.
Step ② Soak the soybeans in the water (for 18 hours)
- Soak the washed soybeans in clean water about four times more than the soybean weight (for 500g/17.6oz of soybeans, use 2 liters/67 fl oz of water) for 18 hours.
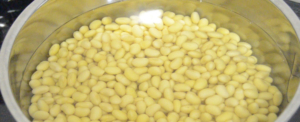
- The soybeans will get about two times bigger after being soaked in the water. So, please prepare a bowl that is big enough.
- If the soybeans are not soaked enough and have a hard core inside, the beans wonʼt cook evenly. Make sure to soak the beans in plenty of time.
Step ③ Boil the soybeans
- Please boil the soybeans with a pressure cooker or in a pot. Use new freshwater to boil the soybeans.
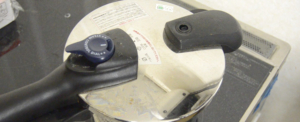
- If you use a pressure cooker, boil them for about 20-30 minutes. If you use a regular pot, cook them for about 3 hours.
- Boil the soybeans until they reach the softness of easily squeezed with thumb and index finger. Be cautious to the heat when checking the softness of the soybeans.
Step ④ Mash the soybeans
- Pour out the boiling water and put the beans into a plastic bag while itʼs hot. Mash the beans by using your hands. It doesnʼt has to be mashed to a complete paste form. The remaining few whole beans wonʼt be a problem.
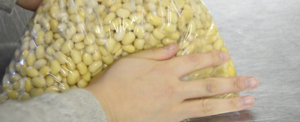
- Be careful not to burn yourself. Using a glove might help if it is too hot.
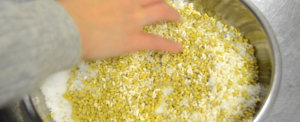
Step ⑤ Mix the malt/koji and salt
- Add koji and salt in a container, then mix thoroughly. The koji and salt mixture is called “Shiokiri Koji.”
- In this step, if you use 50% rice koji and 50% barley koji (as we did in this recipe), you’ll make Mixed/Awase Miso, which has the best, good balance of sweetness. Meanwhile, If you use 100% rice koji, you’ll make Rice Miso. When using 100% barley koji, you’ll make Barley Miso. Lastly, if you use 100% brown rice koji, you’ll make Brown Rice Miso with the unique taste of brown rice.
- ※You can also use raw koji (fresh koji) or dried koji in your preference. In this recipe, we are using dried koji.
Step ⑥ Add mashed soybean in the mixed koji and salt
- To prevent mold growth, mix the three ingredients, soybeans, malt, and salt, carefully and thoroughly. Mix it when the soybeans are warm (not hot) because the koji could lose its fermentation ability at high temperatures.
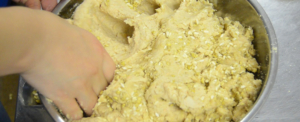
- Usually, it is not necessary to add water. However, if the Miso is dry or hard to mix, you can add some water until it has a softness like an ear lobe.
Step ⑦ Roll the mixed soybean from the previous step into a round/ball form, then put it in the container
- To remove the air from the mixture, form the ingredient mix from previous step into small balls. Then place each ball into the container and press it by fist each time to fill a gap between the balls.
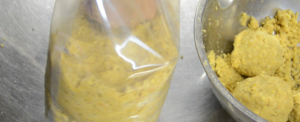
- Because molds can grow within the air gap in the container, please fill it firmly, so there’s no air gap.
- At Kawashimaya, we use preparation plastic pouch with a fastener which can be used for preparation and to keep the miso once it is done. Turn the container (plastic bag) upside down, let the air out, and zip it. If you use enameled metalware or a wooden container, please cover it with plastic wrap (clinging to the miso) to prevent it from touching the open air.
Step ⑧ Let it ferment for about 10 months-12 months
- Keep the prepared miso in a cool dark place and avoid direct sunlight. Do not store it in the fridge as fermentation proceeds in Summer.
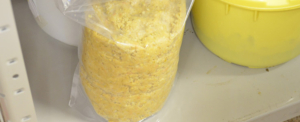
- After ages 10 months-12 months or more, tasty miso is ready. Please keep it refrigerated along with the container. You can keep the finished homemade miso for more than 1 year.